
Hey, guys! 😀
Grace recently wondered if I could do a tutorial on how to edit photos, and I thought that was a great idea! I decided to make this a mini-series, covering basic photo editing, adding effects, touching up photos of people, and maybe a little bit of graphic design and collaging too. I’m really excited!
Anyway, let’s get started. Today I’m going to go over the basic photo editing tools and then show you how to use those tools to fix two common photo problems.
Introduction
I use PicMonkey for pretty much all of my photo editing, and I highly recommend it! It’s very easy to use, and it’s free – although you can pay to upgrade to Royale and get some extra features. (I have Royale, by the way, and I would definitely recommend it if you edit photos a lot. I’ll talk more about Royale later in the series.) But don’t worry about that for now. All the tools I’m going to go over today are completely free.
So, open PicMonkey, and hover over the bar at the top of the page where it says “Edit.” Open the photo you want to work on. The section of the editor that pops up is called “Basic Edits,” and that’s what we’ll be using today.
Basic Edits
- Crop: The first tab of the “Basic Edits” section is “Crop.” Cropping is quite a valuable tool that allows you to cut out ugly surroundings from the corners of your pictures, make the composition of your photo more interesting, or simply zoom in closer to the subject.
- Canvas Color: This just covers your whole picture with one color. You won’t use it to edit your photos, although it’s great for graphic designing.
- Rotate: The rotate tab allows you to flip your picture any way you want. It also allows you to straighten your photo, which is very helpful if you were accidentally holding your camera crooked and your subject looks like it’s sliding off the picture. 😀
- Exposure: In my opinion, this is the most important tab in the Basic Edits section (well, maybe it’s tied with “Crop”). You can work wonders simply by adjusting the exposure of a photo, and we’ll be using this tab a lot, later in this post.
- Colors: This tab includes sliders for saturation and temperature, as well as a mysterious button called “Neutral Picker.” Actually, it’s not that mysterious. 🙂 Basically, when you click on the parts of your photo that should be white, the Neutral Picker auto-adjusts the temperature to turn those off-colored spots white again. Temperature controls how warm or cool a photo is – in other words, whether it has a red (warm) tint or a blue (cool) tint. And saturation, as you probably already know, makes the colors of your photo more saturated and bright.
- Sharpen: Sharpness and Clarity actually ARE different – just a bit. My unscientific description is that Sharpness yields a more subtle effect and focuses on sharpening the details, while Clarity is bolder and boosts the contrast of your photo while giving it a gritty effect at the same time.
- Resize: This simply downsizes your photo to a smaller file size so it takes up less space on your computer (or blog). Anywhere between 800 and 1280 (and even a bit larger) would be a good size for sharing online. One thing to keep in mind is the smaller the size, the lower the quality of the picture.
Using Your Tools
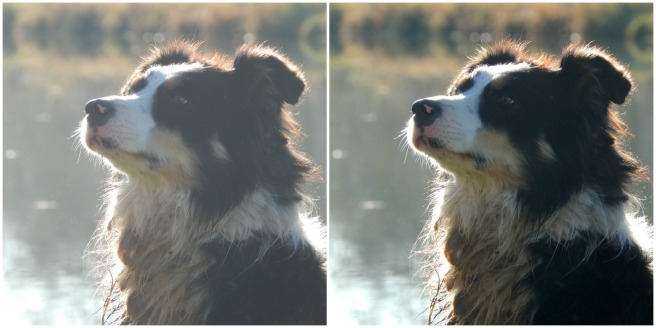
Now that you know what everything does, let’s put your tools to use! I’m just going to show you a few examples and walk you through what I did. (Note: the “before” pictures are on the left, and the “after” pictures on the right. Just in case you couldn’t tell. 😉 )
Isn’t it amazing what the Shadows slider can do? That’s seriously all I did. I moved the “Shadows” slider to -44, and that’s it.

This is a more subtle edit, but I think the “after” picture definitely looks more vibrant. The photo on the left is kind of drab and gray, so I upped the saturation a bit and adjusted the exposure. I also straightened the photo so the ocean isn’t tipped to one side like that. (And hmm, I might have lowered the temperature also, but I can’t recall for sure. Oops. XD )

The main difference in this photo is that now you can actually see the cute wittle kitten instead of losing him in the surrounding scenery. I told you cropping was a helpful tool! 😀 I also straightened the photo so the kitten wasn’t falling off the face of the earth, upped the “Sharpness” slider, and adjusted the exposure just a tad.

Wow, so much better! This picture was washed out to begin with, but by lowering the brightness and shadows, and adding a little bit of contrast, it looks bright and beautiful again like it’s supposed to. And speaking of over-exposed photos, we should move on to the fixer upper part of this post. (By the way, I l♥ve the show Fixer Upper! Have you ever watched it? It’s sooo good. Ahem…)
How to Fix an Over-Exposed Photo
An over-exposed photo is one of my most common problems. But thankfully it’s easy and fun to fix!
This is the photo we’ll start with:

Eh. The content is good, but the lighting is off: it’s too bright and has a sort of bland grayish-white wash over everything. We must rescue this poor photo in distress!
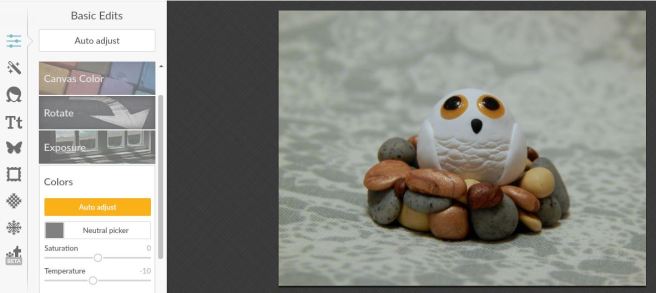
Pretty much everything you need to fix an over-exposed photo is in the Exposure tab, so go ahead and open that up. The two main things to do for an over-exposed picture are to lower the brightness and lower the shadows. Here’s a screenshot of what I did:

You can tell from the sliders that I lowered the brightness and shadows significantly (to -14 and -18 respectively) and added a tiny bit of contrast and highlights. And that’s pretty much it! (Note: I did also use the “Burn” tool to darken a few spots in the photo, but I’ll talk about that more in another post. For now, just concentrate on using the “Exposure” tab.)
Before and after. So much better!

How to Whiten a Photo
Sometimes photos have a weird yellowish or bluish tint, especially on the light parts of a picture.
Like in this photo:

This really isn’t a bad picture, but you can see a slight orangish tinge over everything, which makes it look dingy rather than fresh and clean. It’s especially important to get good, clean-looking photos of products you sell, and this owl just so happens to be in my Etsy shop. So, let’s clean him up a bit, shall we?
First, open the “Exposure” tab.

The main thing you need to do here is bump up the highlight slider, but I also messed with the brightness and shadows slider a bit too. Here’s a tip: use mostly highlights instead of brightness to brighten up a photo, because too much brightness will make the photo look washed out. “Highlights” brightens just the white parts instead of the whole photo.
Next I opened up the “Colors” tab. Since my picture is too red, I moved the Temperature slider down to -10, which added some blue to even it out.
And here’s the before and after. A subtle difference, but do you see how the one on the right looks cleaner, fresher, and more appealing?

Well, I guess that’s it! I give you a pat on the back and a virtual bag of chocolates if you read that whole thing. O.o XD
Heh heh. I hope that was helpful to you! Feel free to ask me any questions in the comments if you didn’t understand something. 🙂
Have a lovely day, lovely people!
***Allison***


This is a great tutorial! I love picmonkey, and use it pretty exclusively for my editing. I’ve started doing more editing lately, because I need to resize photos since my new camera has larger photo size, so while I’m in picmonkey, I tend to edit the photo (mostly exposure, lately). Thanks SO much for the tutorial! (I also appreciate the chocolate ( ❤ ), though the post was great even if it didn't include that, haha!)
Oh, and I'm glad to know what the neutral picker is now. I hadn't known before, and I just made a post where my pics had a white background, and when I read about that feature I pulled one into picmonkey, tried the neutral picker on it, and thought it improved it! Good to know for next time 🙂 .
I'm looking forward to the other parts!
~Gracie
LikeLike
I’m so glad you liked it, Gracie! And you’re very welcome for the chocolates. 😉 XD Hee hee!
Yeah, that’s a helpful little button, isn’t it? Yay! 😀
LikeLike
Love this! I recently just started using Pic-monkey, and I love it!
LikeLike
Thanks, Sarah! I knoooow, I love it too!
LikeLiked by 1 person
😊😃😄
LikeLike
I am enjoying my virtual bag of chocolates right now. Lol! So glad that you’re doing this series. It’s very helpful. 🙂
LikeLike
Heh heh. Well, good. You earned it. XD Thank you so much! I’m glad you liked it!
LikeLiked by 1 person
This was SO helpful, Allison! Thanks!
LikeLike
Hooray! That’s wonderful!
LikeLiked by 1 person
Great post, Allison! Really helpful points made. I think people get a bit overwhelmed with photo editing, they think you need the DSLRs and a copy of Photoshop/Lightroom… Makes me a little sad when you see a photo on a blog which, would otherwise be a great photo, but it needs that extra bit of love and attention given to it. Hopefully your post will point some people in a good direction 🙂
LikeLike
Thank you so much! Yes, I agree. It’s really not as hard as some people think – and it’s a lot of fun, too!
LikeLiked by 1 person
Definitely a lot of fun! I love seeing an image transform in front of me 🙂
LikeLike
Oh, me too!
LikeLiked by 1 person
This was INCREDIBLY helpful! Thank you so much! ~Julia ❤
LikeLike
Aww, yay! I’m so glad to hear that!
LikeLike
Thanks, this was super helpful!
LikeLike
Hooray, I’m so glad!
LikeLike
Awesome tips, Allison! I loved this post, and all the photos in it are lovely. ❤
LikeLike
Aww, thank you!
LikeLike
I love pic monkey!
LikeLike
Me too!
LikeLike
I started using it recently. ;D
LikeLiked by 1 person
Yay! I’m so glad your giving a tutorial about this because my pictures always come out so bad and now I can just edit them! Thanks Grace for requesting this post and thanks Allison for doing it! It’s so helpful!
LikeLike
Ha ha, you’re quite welcome, Sylvia! 😉
LikeLike
That was cool!
LikeLike
Thanks, K. A.! 😀
LikeLiked by 1 person
😀 No prob!
LikeLike
Super helpful 🙂 🙂 I love your tips x x
LikeLike
Aww, thanks! Glad to help! 🙂
LikeLiked by 1 person
You are most welcome dear ❤ ❤ x x
LikeLike
Thank you so much for this wonderful tutorial, Allison! It’s so helpful. 🙂 I can’t wait for the next parts! 😀
Thanks again. 🙂
P.S. Have my letters arrived?
LikeLike
Your quite welcome, Grace! Thank YOU so much for suggesting it!
P. S. YESYESYES THEY HAVE AND I LOVED IT AND THE GIFT! Thank you sooo much! ❤
LikeLiked by 1 person
You’re very welcome, and thanks again! 😀
P.S. HOORAY! I’m SO happy! 😀 I hope Megan liked hers…I wasn’t too sure how to decorate it. XD
LikeLike
YES! I’ll send you an email soon…
Ha ha, yes, I think she thought it was pretty funny. XD 😛
LikeLiked by 1 person
Okay! 😀
Heehee! Well, I’m glad. 😀
LikeLike
This is very helpful! I’m trying to make my blog better by upping my photography skills, and this really helped me 🙂 Thanks Allison!
LikeLike
Aww, I’m so glad to hear that, Audrey! That’s great!
LikeLiked by 1 person
Awesome tutorial, Allison! Thanks for sharing – your photos are sooo pretty! ❤
LikeLike
Thank you so much, Sara! My pleasure! And I’m really glad you like my photos. 🙂
LikeLiked by 1 person
You’re so welcome – I can’t wait to try your tips! I do. ❤
LikeLiked by 1 person
Thanks so so so so so much for this tutorial. I use PicMonkey for editing but didn’t know about half of these tools and what they meant! Your photos look so CUTE (before and after!).
LikeLike
Aww, yay! It makes me so happy to know that my post was helpful! My pleasure!
LikeLiked by 1 person
Thanks a ton Allison!! Since exploring your blog, I have been interested in photography. You are very inspiring ; ) This is a wonderful place to start and it makes everything in photography a little less intimidating. What kind of camera do you use? Can’t wait for the part 2!! ❤
LikeLike
Wow, that’s super! I’m so happy I inspired you! 😁😁😁 Well, I formerly had a Nikon Coolpix L830, which I absolutely LOVED, but I recently decided to get a DSLR, so I now have a Nikon d3400. 🙂
LikeLike
Thanks a ton!!
LikeLiked by 1 person
Thanks so much for sharing this! I use PicMonkey all the time and I love it!
LikeLike
You’re quite welcome, Maddy! I know, me too!
LikeLiked by 1 person
Oho, thanks for sharing. This is just what I was searching for. I have a pretty good camera but am able (so far) to use only the automatic functions and use the simplest editing that the preinstalled photo editing programme on my computer provides. I will definitely try the PicMonkey and intend to upgrade my knowledge so far. Love your photos!
LikeLike
Yay! I’m so happy it was helpful to you! Thank you! 😀
LikeLike
Hey Allison!
I was wondering, how does one import text (that I’ve downloaded from a separate website) into the PicMonkey ‘fonts’ area. I’ve been trying, but it doesn’t seem to be working. I really appreciate your help!
LikeLike
Ooh, good question! I think it should just download to PicMonkey automatically, but you could try refreshing the page. Also, Megan said that Grace (theupstairsgirl.wordpress.com) had that same problem, so you could ask her how she fixed it.
I hope you can get it working, because it’s really nice to have your own fonts, isn’t it? What website do you use? We usually use 1001fonts.com, I think. 🙂
Yeah, no problem! Thanks for asking, and I’m sorry I couldn’t be more helpful. 😦
LikeLike
Thanks so much, Allison! I haven’t tried refreshing the page… I’ll see if that works. 🙂
LikeLike
No problem! I hope it does. 🙂
LikeLike
I have been looking for a great editing app… thank you so much for this. Photography is an essential but bewildering skill for my little business! I will be referring to this often! 👌
LikeLike
That’s wonderful to hear! I’m so glad you liked it. 🙂
LikeLike